
TimecodeMate3 User Manual
Applies to TimecodeMate3 4.1.
TimecodeMate3 is a timecode editor for REAPER with two-way synchronization with grandMA3. You can create and edit Timecodes, Events, Sequences, and Cue data in either application, then exchange the changes with Update. Always start Update from the grandMA3 plug-in, whichever side you edited.
Save the REAPER project and the grandMA3 show before the first Update and before major restructuring. REAPER Undo reverses REAPER edits; it cannot undo a completed write to the console.
Quick start
Install and activate the REAPER extension, then install the grandMA3 plug-in from this release package.
Open the intended REAPER project and grandMA3 show. You can start with data created in REAPER or with an existing grandMA3 Timecode.
Click TimecodeMate3 in the status bar. In About > Server, make sure the server is running and note its IPv4 address and port if grandMA3 is on another computer.
In the correct grandMA3 Data Pool, import the plug-in into a Plugin Pool slot and run
Plugin <slot>.Enter the REAPER address if prompted. To bring an existing MA Timecode into REAPER, choose + MA timecodes (Add from MA) in the Summary. Review the proposed changes, resolve the required choices, then press Update.
Check the completion report, test show-critical changes on the console, and save both the REAPER project and the MA show.
There is no background transfer. Start the plug-in when you want to exchange changes; review any Summary before applying Update. A reconnect can complete an already reviewed exchange.
Requirements and preparation
REAPER 7.71 or newer is required.
Release 4 was verified with grandMA3/onPC 2.4.2.2. Use the REAPER extension and MA plug-in supplied together in the 4.1 package. The MA plug-in itself is unchanged from Release 4; 4.1 changes the REAPER part.
Use the Update connection only on a trusted private network. Its default is TCP port
48003, with no encryption or authentication. Do not port-forward it or expose it to the Internet.
grandMA3 Plugins, Timecodes, and Sequences belong to a Data Pool. Select the Data Pool that contains the intended show material before importing the plug-in or updating. A similarly named object in another Data Pool is a different object.
For two computers, confirm that both are on the same private LAN, REAPER's server is running, and the firewall permits the chosen port on that network. 127.0.0.1 works only when REAPER and grandMA3 run on the same computer.
Install and activate
Install the REAPER extension
Quit REAPER and grandMA3/onPC first.
Windows
Copy reaper_timecodemate3.dll directly into REAPER's UserPlugins folder:
C:\Users\<your user>\AppData\Roaming\REAPER\UserPluginsIf that folder is not obvious, use Options > Show REAPER resource path in REAPER, then open UserPlugins inside the folder it opens. Do not leave the DLL inside an extra release-package folder.
macOS
Run the supplied TimecodeMate3-4.1.0-macos-installer.pkg. If macOS blocks the package, open System Settings > Privacy & Security, choose Open Anyway, then run the package again.
Start REAPER and choose Extensions > TCM3: Show UI. If activation is needed, the activation window opens.
Activate your licence
Activation happens in REAPER. Your licence is supplied as either a Gumroad License key (code) or a .tcm3lic licence file. Use the matching method below. Both methods return a .tcm3key activation key for your computer.
Gumroad code
Use the License key from your Gumroad receipt:
| Platform | What to do |
|---|---|
| Windows | Paste the code under Enter your Gumroad code and select Activate code. The activation key installs automatically. |
| macOS | Select Enter Gumroad code in browser..., enter the code on the page, and download the .tcm3key. Back in TimecodeMate3, select Install .tcm3key... and choose the downloaded file. |
Licence file (.tcm3lic)
Select Open licence file... and choose your
.tcm3licfile.Use the activation page or QR code to obtain the computer-specific
.tcm3key.Install that key: Install existing .tcm3key file... on Windows or Install .tcm3key... on macOS.
The licence code or file identifies your licence; the returned .tcm3key activates the computer. Keep licence and activation-key backups outside UserPlugins.
Offline activation
For a REAPER computer without Internet access, show or refresh the activation QR code and scan it with a connected device. Enter the Gumroad code if that is your licence type. Transfer the downloaded .tcm3key back to REAPER and install it using the appropriate button above.
If the QR route is unavailable, use the offline request option to save a .tcm3req. Transfer it to a connected device and upload it on the activation page. Transfer the returned .tcm3key back to REAPER and install it.
One licence supports up to two machine/profile slots. A key is specific to the computer/profile it activates; contact support when replacing a machine.
Install the grandMA3 plug-in
Keep the complete TimecodeMate3-ma3 folder together; the XML imports Lua files from that folder.
Copy the folder to the grandMA3 plug-in library. The usual Windows location is:
C:\ProgramData\MALightingTechnology\gma3_library\datapools\pluginsIn the selected Data Pool, open a Plugin Pool, choose a free slot, and import
TimecodeMate3-ma3.xmlwith the pathTimecodeMate3-ma3.Run the slot once:
Plugin <slot>
For a later package update, copy the new folder first, then reimport into the same Plugin Pool slot with overwrite. Close a currently open Summary before reimporting.
The show model and time bases
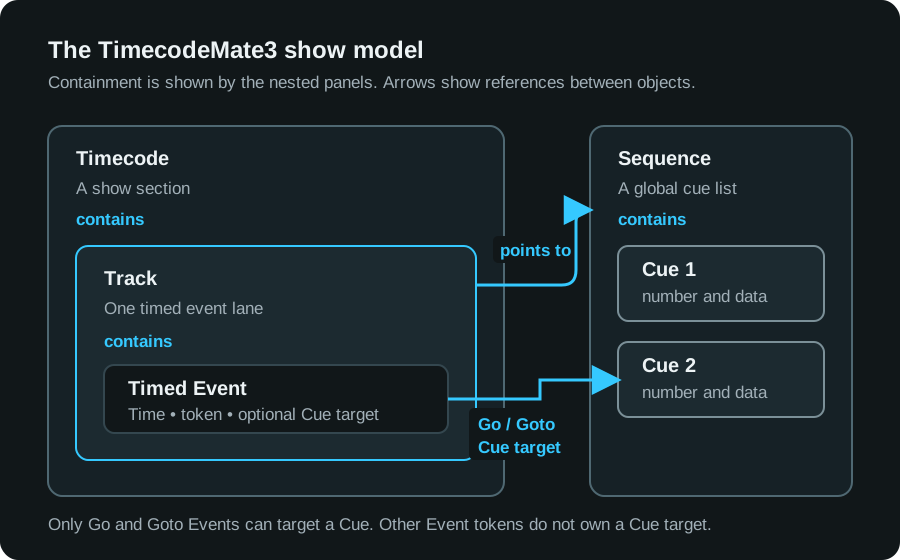
TimecodeMate3 saves its REAPER data in the REAPER project; grandMA3 saves its data in the MA show. Update exchanges changes between the paired objects on both sides. Ordinary REAPER markers and regions remain native REAPER objects.
| Object | Purpose |
|---|---|
| Timecode | A song, scene, act, or other show section with a Start and End in the REAPER project. |
| Track | An event lane inside a Timecode, usually associated with one Sequence. |
| Sequence | A global cue list. More than one Track can use the same Sequence. |
| Cue | A cue number plus name, timing, follow, command, and notes. |
| Event | A timed command on a Track, optionally aimed at a Cue. |
| Marker/Region | An ordinary REAPER timeline object that may be assigned to a Timecode. |
The main window has a Navigator at the left, Timecodes, Tracks, Events, and Markers/Regions tables in the middle, and Sequences and Cues at the right. Click to select; use Ctrl/Cmd-click for additional rows and Shift-click for a range. Double-click a cell or use its edit control to change it. In an editor, Enter commits, Escape cancels, and Tab commits and moves on.
Time display
TimecodeMate3 stores time in seconds. The frame rate controls how time is displayed in hours, minutes, seconds, and frames. Changing the frame rate does not move Events or change their stored time.
Event times can be displayed in two ways:
Absolute: the Event's position in the REAPER project.
Relative: the time from the start of its Timecode.
In Event Columns, turn Display absolute time on for absolute positions or off for relative positions, then choose Apply. This changes the display, not when the Events happen.
For example, an Event ten seconds into a Timecode starting at 01:00:00:00 appears as 01:00:10:00 in absolute mode or 00:00:10:00 in relative mode.
Build and edit a show section
Create a Timecode and Track
On a fresh project, TimecodeMate3 provides a default Timecode, Track, and Sequence. Rename those for a simple song, or add your own:
In Timecodes or the Navigator, add a Timecode and give it a clear name.
Set its Start and End to its absolute REAPER bounds. Keep the bounds wide enough for all intended Events, Markers, and Regions.
Select the Timecode, open Tracks, and choose Add track.
Set the Track name, colour, Sequence, Default Token, and, if useful, its REAPER-track binding.
Allmakes a Track available everywhere.
Use New cue # on a Track to control what happens when new Events are made: None creates no Cue target; automatic choices plan the next or inserted cue; Static number uses the number you enter.
Work with Cues
Select a Sequence in Cues, then choose Add Cue. Edit the cue number, name, Fade In/Out, Delay In/Out, follow, command, and notes as needed. Cue numbers can be decimal, for example 1.5. Select a group of Cues and use Renumber when the whole range needs a new sequence.
Work with Events
Select the target Track.
Put the REAPER edit cursor at the required time. During playback, QuickAdd uses the play position; while stopped, it uses the edit cursor.
Use Add for one Event or Add Events to create a series with an interval and cue-number plan.
Set Time, Token, and, where required, the cue Target.
Go and Goto are the Event tokens that can target Cues. An empty target can follow the appropriate Cue in Sequence order; the table shows that derived target in parentheses, such as (Cue 3). Set an explicit Target when the cue must stay fixed.
The Fade field lets an Event use its Cue timing or an Event override. Open Event Columns for optional fields such as Duration, Region, Cue Delay, Cue Follow, Cue Command, and Cue Notes. Select multiple rows before a batch edit.
The Events ribbon can copy, paste, nudge, move selected Events to the cursor, move them to another Track, lock, disable, or delete them. Pasting keeps the selected Events' relative timing. Deleting an Event does not normally delete the Cue it references.
Work with native Markers and Regions
Use Add marker or Add region in TimecodeMate3 to create normal REAPER objects, or make them in REAPER and manage them in Markers/Regions.
Use the
markersandregionsfilters to narrow the table without changing the REAPER objects.Select a Region and choose Select Events Only to select its Events.
Select Markers/Regions and choose Events at markers to create Events at their positions. Select exactly one target Track first; an Event already at that Track and position is not duplicated.
In Event View, Accept markers as Events can adopt newly observed ordinary REAPER markers. Enable it only for a marker-driven workflow.
Event display markers are editable REAPER markers. Moving or deleting one changes its Event while that Event, Track, and Timecode are editable. If any of them is locked or disabled, TimecodeMate3 restores the projected marker.
Lock prevents normal edits while leaving the object visible. Disable removes a Timecode's or Track's Events from ordinary editing and display work. Neither control chooses an Update direction.
Useful display controls
Open Event View in the status bar to choose Shared lane or Active Timecode track lanes, and whether to show the active Timecode or all enabled Timecodes. These settings affect display, not show data.
The status bar also provides two independent selection controls:
follow reaper selects Events at or before REAPER's edit/play cursor.
reaper follows moves the REAPER edit cursor to the first selected Event.
Click TimecodeMate3 in the status bar for interface scale and the Update server's running state, port, and usable IPv4 addresses. On Windows, it also provides update checks and a download link when an update is available.
Update with grandMA3
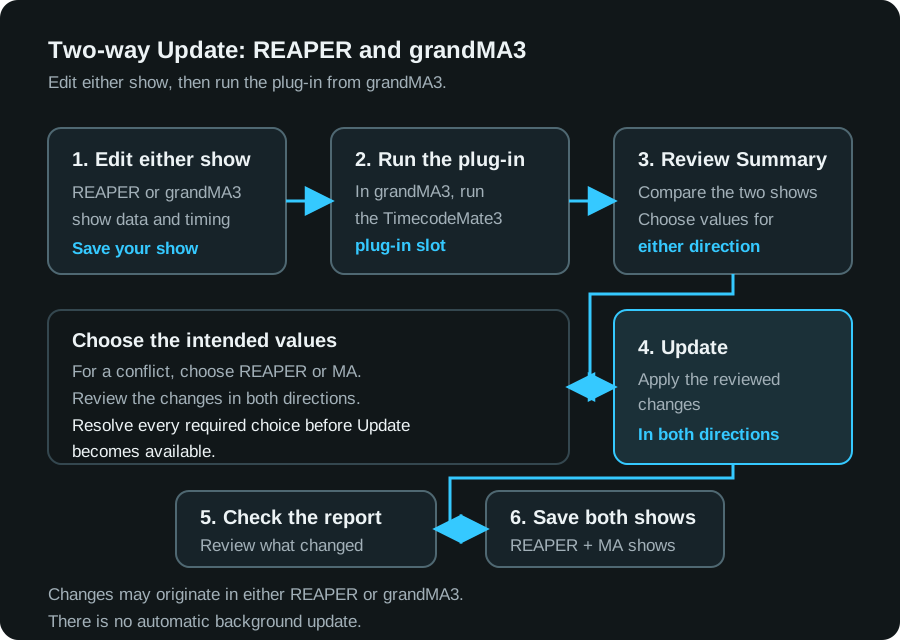
Update is two-way synchronization. Edits made in REAPER can go to grandMA3, and edits made in grandMA3 can come back to REAPER in the same Update. The plug-in runs on grandMA3 for both directions.
Start in REAPER: create your show data, then choose its MA targets in the Summary.
Start in grandMA3: use Add from MA to bring an existing Timecode into REAPER.
Continue in either application: edit the paired data, then run Update again.
Connect and review
Save a REAPER-project and MA-show backup.
Open the intended REAPER project and select the intended MA Data Pool.
In REAPER About > Server, confirm that the server is running. For a networked console, note the IPv4 address and port.
Run the MA plug-in with
Plugin <slot>.
The plug-in first tries its last successful address, or 127.0.0.1:48003 when none has been saved. If that attempt fails, it opens the REAPER endpoint dialog. Enter the REAPER computer's address and the port shown in REAPER, then choose Connect.
The Summary compares the current REAPER and MA values and shows the proposed result. The + MA timecodes button opens Add from MA.
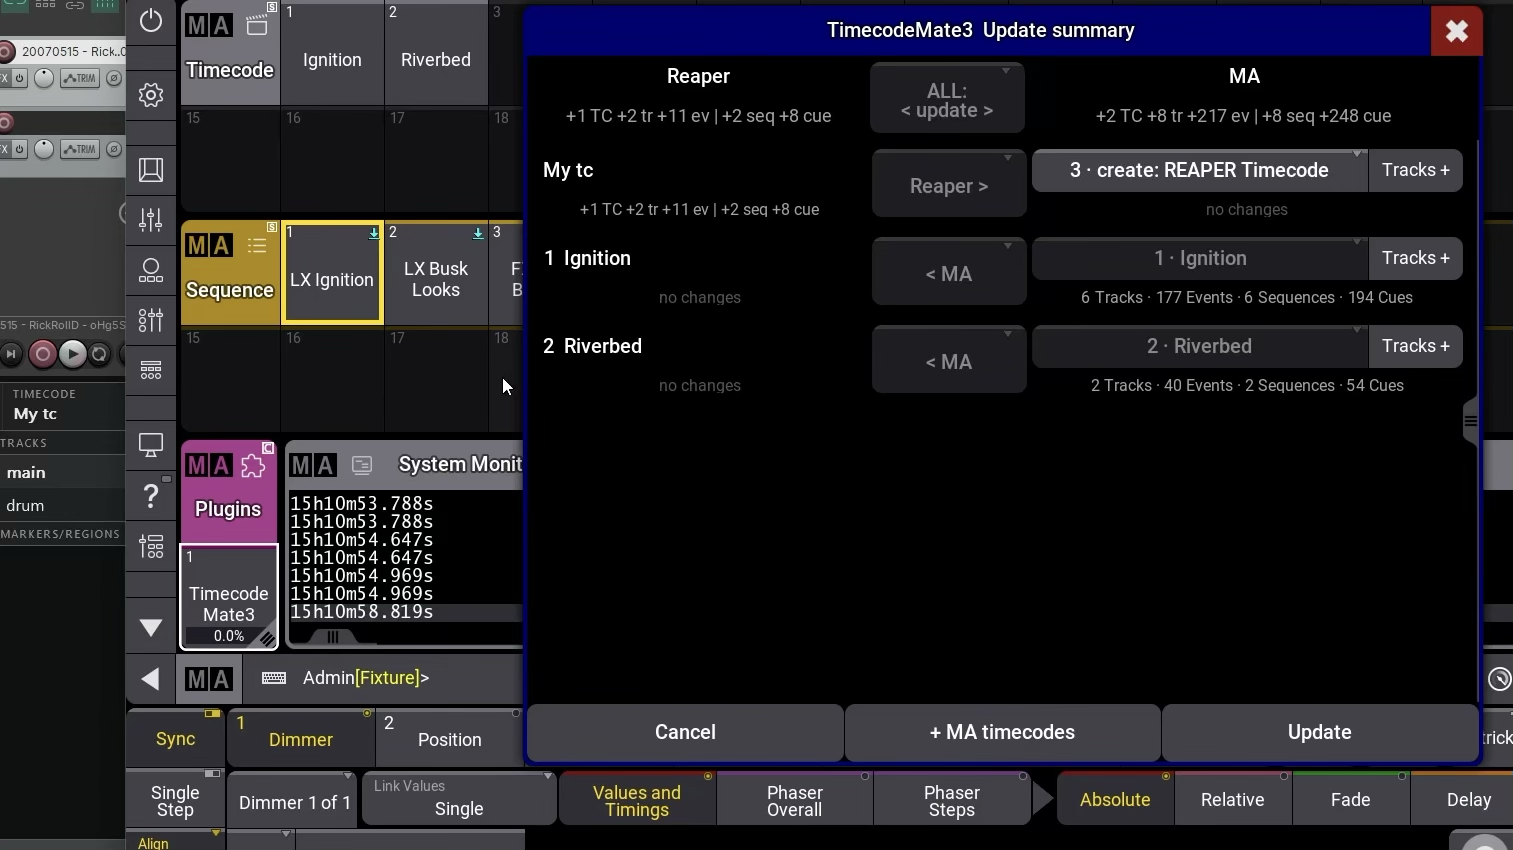
The Summary may ask you to:
select a target or pool slot for a new or unpaired Timecode or Sequence;
choose REAPER or MA for a conflict, where both sides changed the same value differently; or
choose Pause sync / Do not sync for a Timecode that should remain on both hosts without being updated in this run.
Resolve every required choice before Update becomes available. Cancel ends the run without changing the REAPER model or MA show.
When the Summary matches your intention, press Update. Review the resulting created, changed, and deleted-object report. A previously prepared Update that reconnects can sometimes finish without reopening a Summary; it is completing the already reviewed change and is not accepting a new set of show decisions.
Bring an existing grandMA3 Timecode into REAPER
Open the REAPER project that should receive the Timecode. In REAPER About > Server, make sure the server is running.
On grandMA3, select the Data Pool containing that Timecode and run the TimecodeMate3 Plugin slot. Connect to REAPER if prompted.
In the Summary, choose + MA timecodes to open Add from MA.
In Timecodes, enter the MA Timecode Pool number or selection:
3for Timecode 3,1 Thru 5for Timecodes 1–5, or2 + 7for Timecodes 2 and 7. Choose Continue.Review the refreshed Summary. The selected Timecode's Tracks and Events, and the Sequences and Cue data they reference, are included. Check the entire Summary, which may also contain changes from REAPER, and resolve any required choices.
Press Update, check the completion report, then check the imported data in TimecodeMate3 in REAPER. Save the REAPER project and MA show.
You can also preselect the MA Timecode in the command line. For example, if TimecodeMate3 is in Plugin slot 1, this brings Timecode 3 into the reviewed Update flow:
Plugin 1 "add-from-ma 3"The first number is the Plugin Pool slot; the number after add-from-ma is the Timecode Pool number. The command still shows the Summary for review before applying changes.
After the first import, edit in either application and use normal Update. Add from MA is for bringing additional, unpaired MA Timecodes into the project; you do not need to import the same Timecode again after every edit.
Send a new REAPER Timecode to grandMA3
Create the Timecode, Tracks, Events, and Cue data in REAPER.
Run the grandMA3 plug-in and connect to that REAPER project.
In the Summary, choose the requested MA targets or pool slots for the new Timecode and Sequences. Check an existing target carefully before binding it.
Review the proposed changes and press Update. Check the result on grandMA3 and save both sides.
Once paired, the same data can be edited on either side.
Continue editing on either side
Use normal Update after editing in REAPER, grandMA3, or both. In two-way mode, a change made on only one side is carried to the other. If the same value was changed differently on both sides, choose which value to keep.
For example, moving an Event in REAPER and renaming a different Cue in MA can both be included in one Update. If you rename the same Cue differently in both applications, the Summary asks you to resolve that conflict.
The Summary's direction control distinguishes merging changes from making one side match the other:
| Choice | Result |
|---|---|
< update > | Exchange changes in both directions. |
< update > conflicts: Reaper | Exchange changes in both directions; use REAPER values for conflicts. |
< update > conflicts: MA | Exchange changes in both directions; use MA values for conflicts. |
Reaper > | Use REAPER as the source for differing synchronized values in the selected scope. |
< MA | Use MA as the source for differing synchronized values in the selected scope. |
do not sync | Leave the Timecode on both sides without exchanging its changes. |
Use View conflicts to inspect conflicting values individually. Choosing a side for conflicts still keeps non-conflicting edits from both applications. The one-way Reaper > and < MA choices also decide differences that are not conflicts, so review them before applying Update.
Pairing, conflicts, and deletion
Pairing identifies which TimecodeMate3 objects belong together across REAPER and MA. Do not rely on a matching name as proof of a safe pairing: use the Summary's target and conflict choices.
Top-level deletions are intentionally conservative:
Deleting a synchronized Timecode or Sequence in REAPER does not delete its MA counterpart.
Deleting a synchronized MA Timecode does not delete the REAPER Timecode; the REAPER Timecode is paused for Update.
To remove a top-level object from both systems, back up first and delete it deliberately in each system. Use Reset sync state only to rebuild damaged or intentionally discarded pairing information. It does not delete show objects, and it is not the normal solution to a difference in the Summary.
Troubleshooting
TimecodeMate3 does not appear in REAPER
Confirm REAPER is 7.71 or newer.
On Windows, use Options > Show REAPER resource path and check that
reaper_timecodemate3.dllis directly insideUserPlugins.On macOS, run the supplied installer again and complete any macOS security confirmation.
Restart REAPER, then choose Extensions > TCM3: Show UI.
Activation keeps appearing
For a Gumroad purchase, use the receipt's License key with the platform flow above. On macOS, install the downloaded
.tcm3keyafterwards.If you have an activation key, use Install existing .tcm3key file... on Windows or Install .tcm3key... on macOS, then choose the file returned for this computer.
Use Open licence file... only when you were actually supplied a
.tcm3licfile.If the licence has no available machine slot, contact support@vldurnov.com for a machine replacement.
grandMA3 cannot import or run the plug-in
Check that the full
TimecodeMate3-ma3folder, including its XML and Lua files, is in the MA plug-in library.Import
TimecodeMate3-ma3.xmlwith theTimecodeMate3-ma3path into a Plugin Pool slot in the intended Data Pool.For an update, copy the replacement folder and overwrite the existing slot.
Read grandMA3 System Monitor to confirm which plug-in was loaded.
The REAPER endpoint will not connect
Confirm the REAPER server is running in TimecodeMate3 > About > Server.
Check the address and port. Do not use
127.0.0.1for a different computer.Check the private LAN and the firewall rule for the selected port.
Confirm that both halves came from the same 4.1 release package. An incompatibility message means they cannot update together.
The Summary will not allow Update
A required decision is still unresolved. Read the row requesting a side, target, or pool slot. If you cannot identify the correct result, cancel and compare the two backups instead of guessing during a show.
A projected Event marker returns after I move or delete it
The Event, its Track, or its Timecode is locked or disabled. Unlock or enable the applicable object, make the edit again, and save the REAPER project.
Need help purchasing or activating?
Buy TimecodeMate3 at plugins.vldurnov.com/l/TimecodeMate3, or contact support@vldurnov.com.
Command reference
REAPER extension actions
These actions are available in REAPER's Extensions menu and Action List:
| Action | Use |
|---|---|
TCM3: Show UI | Open the TimecodeMate3 window. |
TCM3: Create event at cursor | Add an Event on the selected Track at the cursor. |
TCM3: Create event and new cue at cursor | Add an Event and a Cue at the cursor. |
TCM3: Delete selected events | Delete selected Events. |
TCM3: Convert TimecodeMate 2 markers to Events | Migration aid; back up and inspect the result before Update. |
TCM3: Reset UI layout (columns, panes, scale) | Restore the TimecodeMate3 layout defaults. |
grandMA3 plug-in commands
Replace <slot> with the Plugin Pool slot containing TimecodeMate3.
Plugin <slot>
Plugin <slot> "add-from-ma 1 Thru 5"
Plugin <slot> "reset"
The first command runs Update. add-from-ma opens the reviewed Update flow with the specified MA Timecodes selected. reset opens the Reset sync state recovery flow.